Config Subnet
Subnet is a core concept and basic unit of use in Kube-OVN, and Kube-OVN organizes IP and network configuration in terms of Subnet. Each Namespace can belong to a specific Subnet, and Pods under the Namespace automatically obtain IPs from the Subnet they belong to and share the network configuration (CIDR, gateway type, access control, NAT control, etc.).
Unlike other CNI implementations where each node is bound to a subnet, in Kube-OVN the Subnet is a global level virtual network configuration, and the addresses of one Subnet can be distributed on any node.

There are some differences in the usage and configuration of Overlay and Underlay Subnets, and this document will describe the common configurations and differentiated features of the different types of Subnets.
Default Subnet
To make it easier for users to get started quickly, Kube-OVN has a built-in default Subnet, all Namespaces that do not explicitly declare subnet affiliation are automatically assigned IPs from the default subnet and the network information. The configuration of this Subnet is specified at installation time, you can refer to Built-in Network Settings for more details. To change the CIDR of the default Subnet after installation please refer to Change Subnet CIDR.
In Overlay mode, the default Subnet uses a distributed gateway and NAT translation for outbound traffic, which behaves much the same as the Flannel's default behavior, allowing users to use most of the network features without additional configuration.
In Underlay mode, the default Subnet uses the physical gateway as the outgoing gateway and enables arping to check network connectivity.
Check the Default Subnet
The default field in the default Subnet spec is set to true, and there is only one default Subnet in a cluster, named ovn-default.
# kubectl get subnet ovn-default -o yaml
apiVersion: kubeovn.io/v1
kind: Subnet
metadata:
  creationTimestamp: "2019-08-06T09:33:43Z"
  generation: 1
  name: ovn-default
  resourceVersion: "1571334"
  selfLink: /apis/kubeovn.io/v1/subnets/ovn-default
  uid: 7e2451f8-fb44-4f7f-b3e0-cfd27f6fd5d6
spec:
  cidrBlock: 10.16.0.0/16
  default: true
  excludeIps:
  - 10.16.0.1
  gateway: 10.16.0.1
  gatewayType: distributed
  natOutgoing: true
  private: false
  protocol: IPv4
Join Subnet
In the Kubernetes network specification, it is required that Nodes can communicate directly with all Pods. To achieve this in Overlay network mode, Kube-OVN creates a join Subnet and creates a virtual NIC ovn0 at each node that connect to the join subnet, through which the nodes and Pods can communicate with each other.
The configuration of this Subnet is specified at installation time, you can refer to Built-in Network Settings for more details. To change the CIDR of the Join Subnet after installation please refer to Change Join CIDR.
Check the Join Subnet
The default name of this subnet is join. There is generally no need to make changes to the network configuration except the CIDR.
# kubectl get subnet join -o yaml
apiVersion: kubeovn.io/v1
kind: Subnet
metadata:
  creationTimestamp: "2019-08-06T09:33:43Z"
  generation: 1
  name: join
  resourceVersion: "1571333"
  selfLink: /apis/kubeovn.io/v1/subnets/join
  uid: 9c744810-c678-4d50-8a7d-b8ec12ef91b8
spec:
  cidrBlock: 100.64.0.0/16
  default: false
  excludeIps:
  - 100.64.0.1
  gateway: 100.64.0.1
  gatewayNode: ""
  gatewayType: ""
  natOutgoing: false
  private: false
  protocol: IPv4
# ifconfig ovn0
ovn0: flags=4163<UP,BROADCAST,RUNNING,MULTICAST>  mtu 1420
        inet 100.64.0.4  netmask 255.255.0.0  broadcast 100.64.255.255
        inet6 fe80::800:ff:fe40:5  prefixlen 64  scopeid 0x20<link>
        ether 0a:00:00:40:00:05  txqueuelen 1000  (Ethernet)
        RX packets 18  bytes 1428 (1.3 KiB)
        RX errors 0  dropped 0  overruns 0  frame 0
        TX packets 19  bytes 1810 (1.7 KiB)
        TX errors 0  dropped 0 overruns 0  carrier 0  collisions 0
Create Custom Subnets
Here we describe the basic operation of how to create a Subnet and associate it with a Namespace, for more advanced configuration, please refer to the subsequent content.
Create Subnet
cat <<EOF | kubectl create -f -
apiVersion: kubeovn.io/v1
kind: Subnet
metadata:
  name: subnet1
spec:
  protocol: IPv4
  cidrBlock: 10.66.0.0/16
  excludeIps:
  - 10.66.0.1..10.66.0.10
  - 10.66.0.101..10.66.0.151
  gateway: 10.66.0.1
  gatewayType: distributed
  natOutgoing: true
  namespaces:
  - ns1
  - ns2
EOF
cidrBlock: Subnet CIDR range, different Subnet CIDRs under the same VPC cannot overlap.excludeIps: The address list is reserved so that the container network will not automatically assign addresses in the list, which can be used as a fixed IP address assignment segment or to avoid conflicts with existing devices in the physical network in Underlay mode.gateway:For this subnet gateway address, Kube-OVN will automatically assign the corresponding logical gateway in Overlay mode, and the address should be the underlying physical gateway address in Underlay mode.namespaces: Bind the list of Namespace for this Subnet. Pods under the Namespace will be assigned addresses from the current Subnet after binding.
Create Pod in the Subnet
# kubectl create ns ns1
namespace/ns1 created

# kubectl run nginx --image=nginx:alpine -n ns1
deployment.apps/nginx created

# kubectl get pod -n ns1 -o wide
NAME                     READY   STATUS    RESTARTS   AGE   IP           NODE    NOMINATED NODE   READINESS GATES
nginx-74d5899f46-n8wtg   1/1     Running   0          10s   10.66.0.11   node1   <none>           <none>
Overlay Subnet Gateway Settings
This feature only works for Overlay mode Subnets, Underlay type Subnets need to use the underlying physical gateway to access the external network.
Pods under the Overlay Subnet need to access the external network through a gateway, and Kube-OVN currently supports two types of gateways: distributed gateway and centralized gateway which can be changed in the Subnet spec.
Both types of gateways support the natOutgoing setting, which allows the user to choose whether snat is required when the Pod accesses the external network.
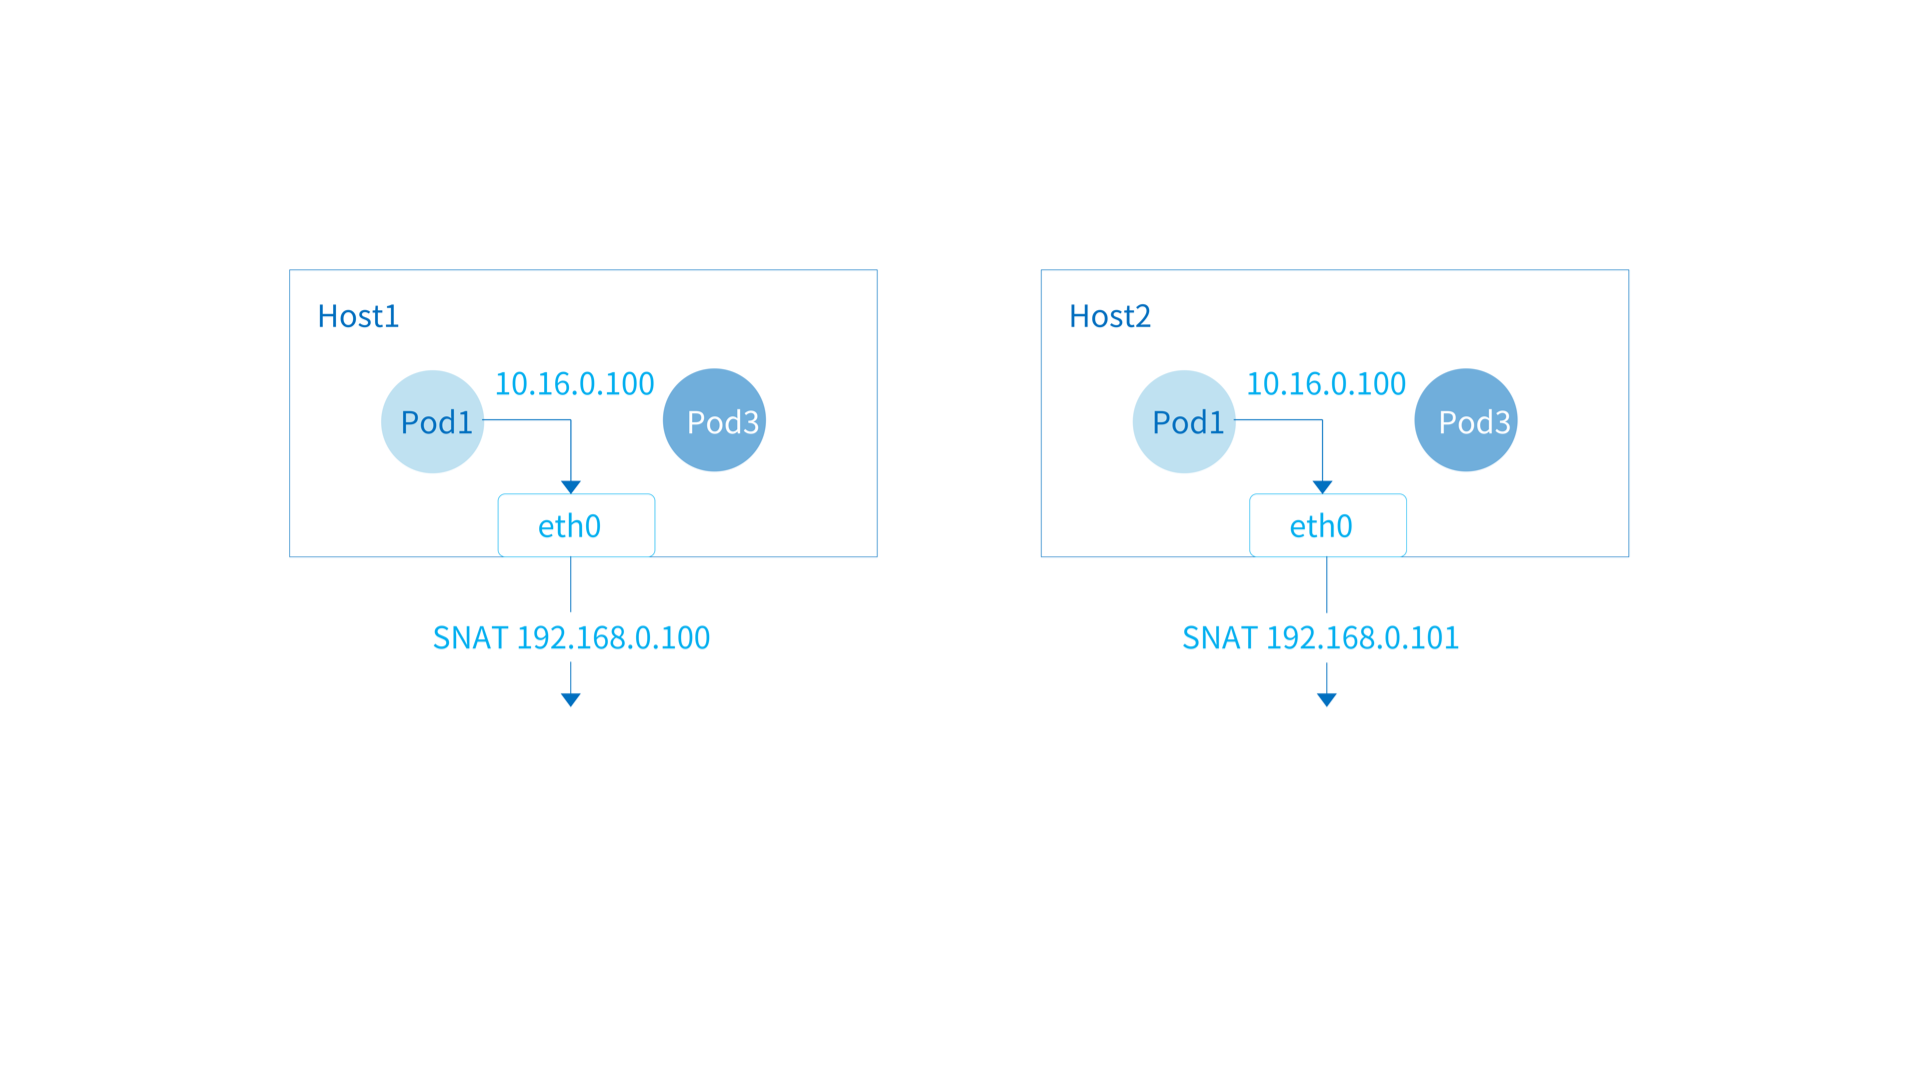
Distributed Gateway
The default type of gateway for the Subnet, each node will act as a gateway for the pod on the current node to access the external network. The packets from container will flow into the host network stack from the local ovn0 NIC, and then forwarding the network according to the host's routing rules. When natOutgoing is true, the Pod will use the IP of the current host when accessing the external network.
Example of a Subnet, where the gatewayType field is distributed:
apiVersion: kubeovn.io/v1
kind: Subnet
metadata:
  name: distributed
spec:
  protocol: IPv4
  cidrBlock: 10.166.0.0/16
  default: false
  excludeIps:
  - 10.166.0.1
  gateway: 10.166.0.1
  gatewayType: distributed
  natOutgoing: true
Centralized Gateway
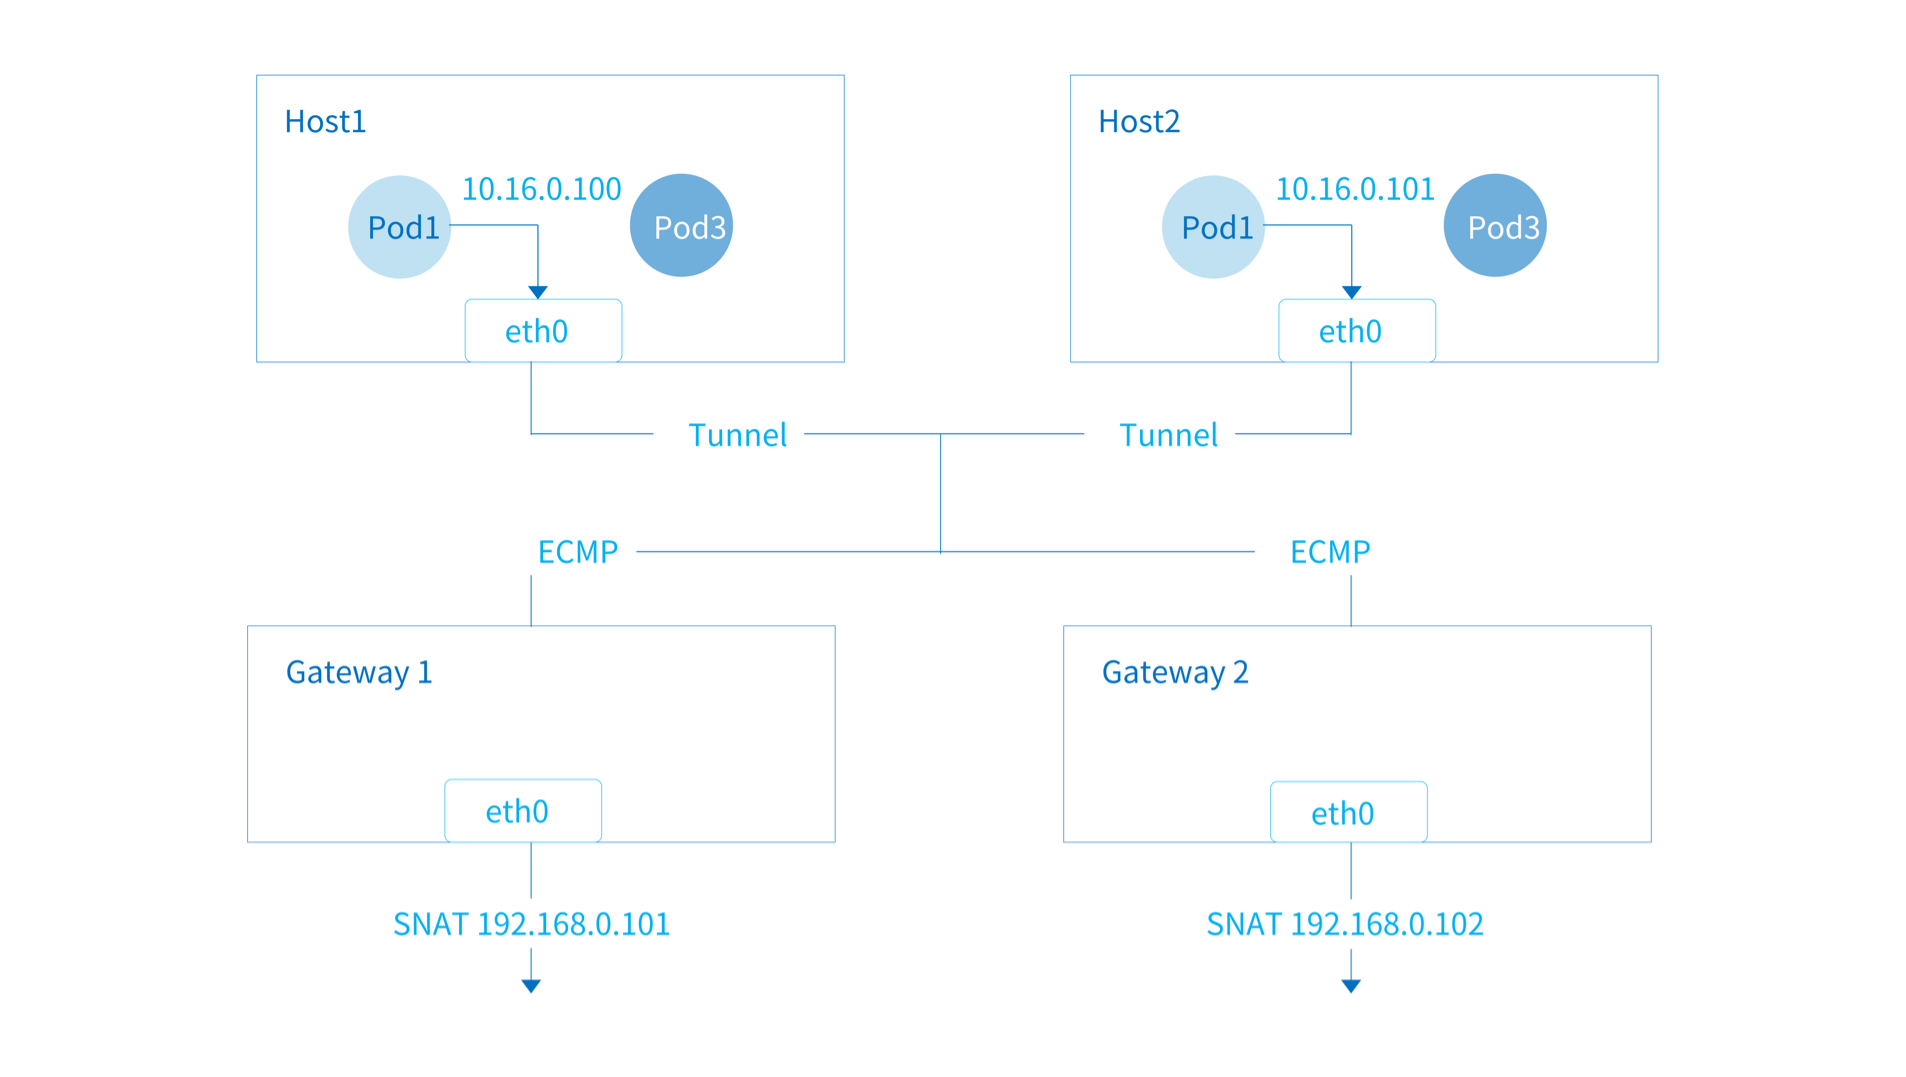
If you want traffic within the Subnet to access the external network using a fixed IP for security operations such as auditing and whitelisting, you can set the gateway type in the Subnet to centralized. In centralized gateway mode, packets from Pods accessing the external network are first routed to the ovn0 NIC of a specific nodes, and then outbound through the host's routing rules. When natOutgoing is true, the Pod will use the IP of a specific nodes when accessing the external network.
The centralized gateway example is as follows, where the gatewayType field is centralized and gatewayNode is the NodeName of the particular machine in Kubernetes.
apiVersion: kubeovn.io/v1
kind: Subnet
metadata:
  name: centralized
spec:
  protocol: IPv4
  cidrBlock: 10.166.0.0/16
  default: false
  excludeIps:
  - 10.166.0.1
  gateway: 10.166.0.1
  gatewayType: centralized
  gatewayNode: "node1,node2"
  natOutgoing: true
- If a centralized gateway wants to specify a specific NIC of a machine for outbound networking,
gatewayNodeformat can be changed tokube-ovn-worker:172.18.0.2, kube-ovn-control-plane:172.18.0.3. - The centralized gateway defaults to primary-backup mode, with only the primary node performing traffic forwarding. If you need to switch to ECMP mode, please refer to ECMP Settings.
Subnet ACL
For scenarios with fine-grained ACL control, Subnet of Kube-OVN provides ACL to enable fine-grained rules.
The ACL rules in Subnet are the same as the ACL rules in OVN, and you can refer to ovn-nb ACL Table for more details. The supported filed in match can refer to ovn-sb Logical Flow Table.
Example of an ACL rule that allows Pods with IP address 10.10.0.2 to access all addresses, but does not allow other addresses to access itself, is as follows:
apiVersion: kubeovn.io/v1
kind: Subnet
metadata:
  name: acl
spec:
  acls:
    - action: drop
      direction: to-lport
      match: ip4.dst == 10.10.0.2 && ip
      priority: 1002
    - action: allow-related
      direction: from-lport
      match: ip4.src == 10.10.0.2 && ip
      priority: 1002
  cidrBlock: 10.10.0.0/24
Subnet Isolation
The function of Subnet ACL can cover the function of Subnet isolation with better flexibility, we recommend using Subnet ACL to do the corresponding configuration.
By default the Subnets created by Kube-OVN can communicate with each other, and Pods can also access external networks through the gateway.
To control access between Subnets, set private to true in the subnet spec, and the Subnet will be isolated from other Subnets and external networks and can only communicate within the Subnet. If you want to open a whitelist, you can set it by allowSubnets. The CIDRs in allowSubnets can access the Subnet bidirectionally.
Enable Subnet Isolation Examples
apiVersion: kubeovn.io/v1
kind: Subnet
metadata:
  name: private
spec:
  protocol: IPv4
  default: false
  namespaces:
  - ns1
  - ns2
  cidrBlock: 10.69.0.0/16
  private: true
  allowSubnets:
  - 10.16.0.0/16
  - 10.18.0.0/16
Underlay Settings
This part of the feature is only available for Underlay type Subnets.
vlan: If an Underlay network is used, this field is used to control which Vlan CR the Subnet is bound to. This option defaults to the empty string, meaning that the Underlay network is not used.logicalGateway: Some Underlay environments are pure Layer 2 networks, with no physical Layer 3 gateway. In this case a virtual gateway can be set up with the OVN to connect the Underlay and Overlay networks. The default value is:false.
Gateway Check Settings
By default kube-ovn-cni will request the gateway using ICMP or ARP protocol after starting the Pod and wait for the return to verify that the network is working properly. Some Underlay environment gateways cannot respond to ARP requests, or scenarios that do not require external connectivity, the checking can be disabled .
apiVersion: kubeovn.io/v1
kind: Subnet
metadata:
  name: disable-gw-check
spec:
  disableGatewayCheck: true
Other Advanced Settings
- Manage QoS
- Manage Multiple Interface
- DHCP
- External Gateway
- Cluster Inter-Connection with OVN-IC
- VIP Reservation
Created: June 30, 2022